
It is crucial to have a sharp chisel to ensure hassle-free woodworking. A chisel is an indispensable tool for any woodworker, and it’s vital to have for most projects. To sharpen a chisel you need a grinder or sharpening stone and a honing guide.
Although it is possible to sharpen a chisel without a honing guide, the process will become very tedious: without it, you’ll need to maintain a certain angle while you sharpen the tip. Without a honing guide, there is also the risk of shifting the angle of the chisel.
We have compiled a short list of some of the best honing guides for sharpening chisels. There are also additional recommendations that will help you become better at sharpening your tools. Let’s take a look:
Honing Guides for Sharpening Chisels
ATLIN Honing Guide


Pros
- Easy to use.
- It provides a straight cutting edge.
- Durable construction.
- Adjustable tool projection.
- It allows you to choose your preferred sharpening angles.
Cons
- Some users have reported manufacturing defects.
- The tension screw does not hold well.
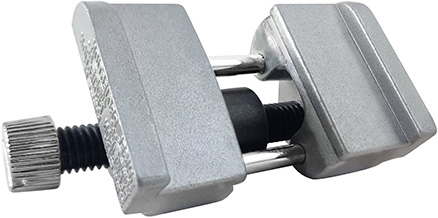
Our top pick on this list is the ATLIN honing guide, an ideal tool for sharpening chisel and planer blades. An essential feature of this product comes with its multiple sharpening angles. It means you can sharpen your sculpting tools at nearly any angle, thereby ensuring versatility. Besides, thanks to its detailed instruction manual, this tool is significantly easy to use.
This sharpening guide also has a fully adjustable self-centering feature. Hence, it can fit plane irons (1-3/8 inches to 3-1/8 inches in width) and chisels (1/8 inches to 1-7/8 inches in width). Additionally, the manufacturers have built this honing guide to last. Thanks to its durable cast aluminum and a hardened steel roller wheel.
Product Details:
| Product Dimensions | 1.5 x 1.3 x 4.1 inches |
|---|---|
| Item Weight | 8.8 ounces |
Sharp Pebble Honing Guide


Pros
- Excellent precision.
- Chisel and plane iron projection measurements allow for 30°, 25°, and 20° angles.
- It allows for achieving a perfect edge.
- The pieces fit well.
- Worth the price.
- Link to download eBook instruction guide.
Cons
- Some users have reported that the plane iron does not seat completely flat.
- Not the best option if you are looking for a premium product.
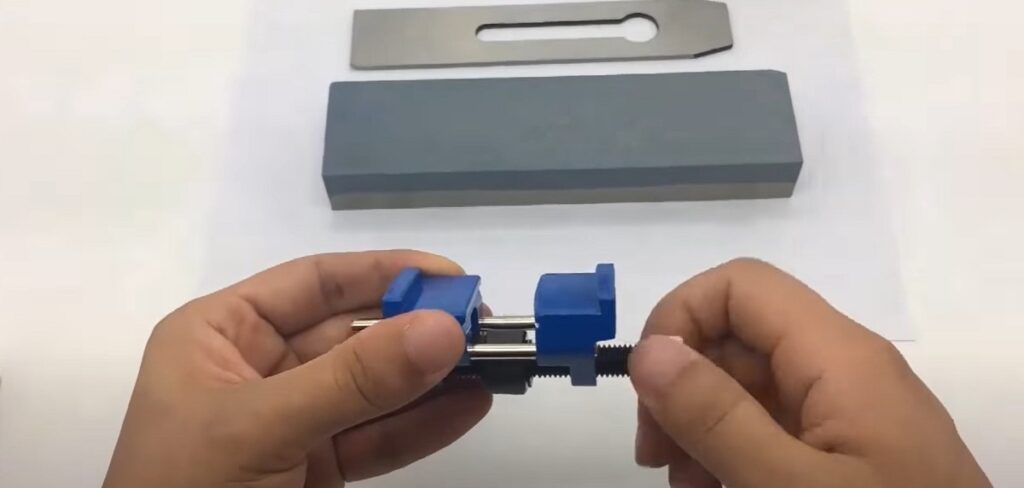
If precision is what you are looking for in a honing guide, this product is for you. It allows you to easily choose your preferred sharpening angle, thereby achieving an ideal edge on your tools. Besides, it features a high-quality stainless steel design, which means you can use it for an extended period.
Another attribute of this product is that it is easy to use. Thanks to its manual/eBook instructions and adjustable features. Plus, you can use this honing guide to sharpen several tools, such as chisels, beveled edge chisels, hand planes, mortise chisels, plane irons, etc.
Product Details:
| Product Dimensions | 4.7 x 1.6 x 1.2 inches |
|---|---|
| Item Weight | 11.2 ounces |
LepoHome Stainless Steel Honing Guide


Pros
- Affordable.
- Simple to use.
- Brass roller wheel.
- It is not easy to rust.
- You can adjust the blade angle.
- It comes with an open-end retaining ring design.
Cons
- Issues with the screw.
- The clamping surface is relatively rough.
As the name itself suggest, this product features stainless steel construction. Hence, you can use it for a longer period without getting damaged. It also has a fully adjustable clamping width of 0.2 inches to 3.2 inches. Besides, you can adjust the clamping width by rotating the screw cap.
Another essential feature of the honing guide relates to its functionality. You can use it to sharpen a chisel, plane iron, planer, flat chisel edge, carving knife, etc.
Product Details:
| Package Dimensions | 5.2 x 4.69 x 1.5 inches |
|---|---|
| Item Weight | 9.9 ounces |
KAKURI Honing Guide


Pros
- It provides smooth and accurate sharpening.
- An ideal honing guide for beginners.
- Heavy-duty steel.
- Excellent wear resistance.
- Easy-to-grip wooden handles.
Cons
- Quite expensive.
- Difficult to make edges square.
This product comes from a reputable manufacturer that has been in business for more than 70 years. The KAKURI Corporation also claims that they handcraft each product individually. Hence, you can expect this honing guide to be reliable and durable.
An essential feature of this product is that it has a roller on the device. So you will not have a hard time moving the blade on the sharpening stone. Besides, you can fix the blade easily with the help of an attached screw.
However, the best attribute comes with the easy-to-grip wooden handles. When sharpening your chisel, you do not need to touch the blade directly. For this reason, it offers a safe experience.
Product Details:
| Product Dimensions | 2.83 x 7.08 x 2.83 inches |
|---|---|
| Item Weight | 1 pound |
TOLESA Honing Guide


Pros
- It is suitable for sharpening different tools.
- Tighter quality control.
- Durable construction.
- It keeps your tool at an accurate angle.
Cons
- The casting is relatively rough.
- Difficult to set the angle.
If you are looking for an affordable but quality honing guide, then you should consider this product. The material construction comes with stainless steel bearings and durable cast aluminum. Plus, thanks to its rust-free coating, you can use this honing guide for an extended period.
Another essential feature of this product is that it comes with an adjustable tool projection. Chisel and plane iron projection measurements allow for 30° and 25° angles. Besides, you can adjust the clamping width by rotating the screw-cap, thereby providing excellent compatibility.
Product Details:
| Package Dimensions | 4.53 x 2.13 x 1.65 inches |
|---|---|
| Item Weight | 2.2 pounds |
AHNR Professional Whetstone Knife Sharpener Kit


Pros
- It does not require expensive honing oil.
- The stone has a coarse side of 1000 and a fine side of 6000.
- Nonslip rubber base.
- Avoid direct contact with the blade while sharpening.
Cons
- The 6000 grit side is not adequately smooth.
Buying the best honing guide without a sharpening stone is incomplete. But with this product, you get the full package. This honing guide will help you achieve the ideal edge on your tools. Thanks to its adjustable angle feature!
The product also comes with grooved jaws for clamping paring planer blades and chisels.
However, the best thing about this product is that it comes with a whetstone—a double-sided sharpener. Besides, it requires only water.
Product Details:
| Product Dimensions | 9.06 x 8.4 x 3.35 inches |
|---|---|
| Item Weight | 4.59 pounds |
Trend Stone Tool Sharpening Set


Pros
- Easy to use.
- Projection measurements allow for 25°, 30°, and 40° angles.
- It is budget-friendly.
- Good retention.
Cons
- Slightly difficult to set the angle.
- It is not suitable for firmer chisels or butt chisels.
If you are looking for a honing guide to use with a diamond stone, this product is for you. The manufacturers have designed this product to ensure an accurate angle when sharpening on a diamond stone.
Unlike other products, this honing guide clamps from the side, thereby providing a 90° to the guide. Additionally, it comes with a wide roller to prevent rocking during use.
Product Details:
| Item Weight | 14.4 ounces |
|---|---|
| Product Dimensions | 6.3 x 3.74 x 1.57 inches |
Considerations When Looking for a Chisel Honing Guide
Chisel Angle
One of the essential factors to consider when looking for a chisel honing guide is the chisel angle. This aspect will determine the overall usefulness of the tool. In other words, adjusting the angle will allow you to sharpen several variations of chisels and tools.
We recommend opting for a chisel that has an adjustable sharpening angle. This way, you can use the honing guide for sharpening different sculpting tools and different edge angles. Do not ignore this aspect unless you want to buy several honing guides, each one for a different tool or different angle.
Size & Compatibility
It is worth noting that not all honing guides are compatible with all chisels or plane irons. Hence, it becomes crucial to ensure that your chisel is compatible with your preferred honing guide.
Measure the width of your chisels and opt for a honing guide that can fit most of them in their range.
Material
Material is another essential factor that you should consider when buying a chisel honing guide. Remember, the type of material you choose for your honing guide will decide its durability.
We recommend opting for a honing guide that uses steel and aluminum as its primary manufacturing materials. These materials are highly robust and keep corrosion and rust at bay. However, it will help if you avoid materials, such as wood and plastic.
How to Sharpen a Chisel with a Honing Guide – Step by Step
You can quickly sharpen a chisel as long as it is in good shape and require only a new edge. However, note that the following method will be significantly slower for a dinged-up or damaged chisel. Besides, the materials required for carrying out this method include plate glass, lubricating oil, and wet/dry sandpaper. On the other hand, you will need tools, such as—
- Leather gloves.
- Dust mask.
- Sharpening stone.
- Grinding wheel.
- Starwheel dresser.
- Safety glasses.
- Rags.
1. Adjust the honing guide according to chisel width
The first step would be to get the honing guide ready according to the width of the chisel you’ll be sharpening. Adjust the threads of the honing guide and make sure the chisel fits snugly without any play.
2. Flatten the back of the chisel
To flatten the back of your chisel, you should rub the back a few times on 220-grit. Ensure that you carry out the rubbing in a diagonal direction.
Next, turn over your chisel and look for scratches. You should continue rubbing on 220-grit if your chisel is almost covered with scratches. However, you will have to start with a coarser if you notice scratches only on a few high spots. Remember, you cannot stop this process until the scratches widen throughout the two-inch width of the back.
3. Set the Honing Angle

To set the honing angle, you will need to measure the distance the blade projects from the guide. As mentioned, the most ideal angle for sharpening chisels is around 30 degrees. You can get this angle by drawing a 1-3/16 inch line on a piece of wood starting from the edge. Next, you should extend your chisel to the line.
3. Start the honing process

After adjusting your honing guide, and setting your preferred angle, start the honing process by giving consistent strokes. You should start feeling a “wire edge”, or in other words rough sharpness.
4. Use a higher grit stone, or sandpaper to smoothen out the surface
Use a sharpening stone with a higher grit to remove any signs of roughness in this sharp edge. The finer the grit, the smoother the surface. Keep the angle consistent and keep checking the overall sharpness. If not satisfied with how it turned out, repeat the step above, and then use a higher grit to remove the imperfections again.
5. Repeat until sufficiently sharp
Here, you should keep grinding your chisel until its end comes to a point. However, to avoid ruining your chisel, you should dip your chisel in water every three to five seconds. This way, you can prevent overheating.
Frequently Asked Questions
What angle should you set your honing angle to when sharpening chisels?
Typically, new chisels come with a standard angle, which is usually 25 degrees. However, the ideal angle for sharper chisels and general usage is 30 degrees. Set your honing guide to 30 degrees for optimal results. Don’t worry if you end up with two slopes, as this will make you grind away less material and make your chisel last longer.
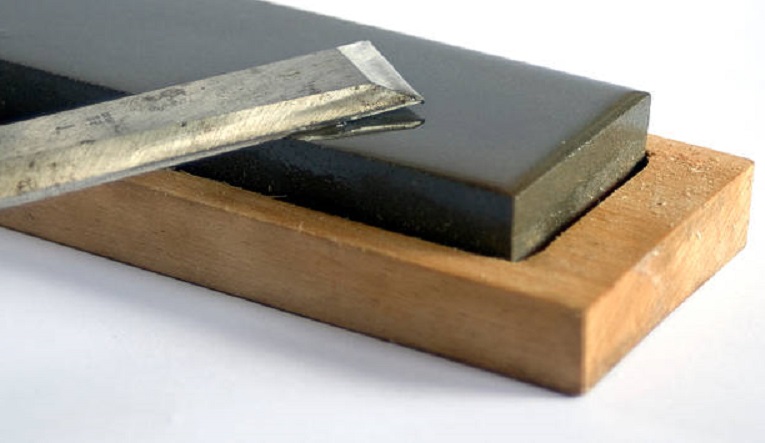
What kind of sharpening stone is best?
There are mainly three types of sharpening stones, and deciding the best will depend on your needs and preferences. Diamond stones are significantly versatile and durable. Unlike other sharpening tools, diamond stone allows you to sharpen any sculpting tools. Furthermore, it does not wear unevenly due to its hard surface. However, the downside is that diamond stone is the most expensive.
However, if you are looking for an excellent cost-effective sharpening stone, consider a Waterstone or whetstone. Unlike an oilstone, a Waterstone is easier to clean as it uses water to remove the swarf.
Sharpening stone vs. grinding wheel for sharpening chisels
You can use various tools when sharpening a chisel with a honing guide. Most woodworkers and carpenters possess one or several sharpening stones, they are inexpensive, easy to use, and only require some elbow grease to sharpen a chisel. On the other hand, a grinding wheel is a rotating piece of equipment with an abrasive surface to remove material off surfaces.
For use with a honing guide, consider how often you’re going to be using it. If you only sharpen your chisels a couple of times a month, a sharpening stone is practical and economical. If you are working on big projects and find yourself needing to sharpen chisels several times a day, a grinding wheel might be a worthy investment.
Which grit should you use?
We recommend starting with a coarse grit; only then should you gradually move to a higher grit. For instance, you can start at 80 or 100 and gradually move to 200, or 400. Depending on the sharpness level you’re looking for you could progressively move to a 2000 grit stone, but this grit level is usually unnecessary.
Additional tips when using a honing guide to sharpen chisels
Keep Your Chisel Cool
Ensure that you maintain an appropriate temperature to keep the blade from overheating and being damaged from excessive heat. Grinding a chisel against a sharpening stone will produce heat, so there needs to be a pause every few seconds. Keep water nearby and submerge the tip if necessary.
If the edge of the chisel turns a blue-orange color, that section of steel has been damaged by heat. You’ll need to remove the blued part by grinding past that point. If you are a beginner, start with your least-favorite chisel, you don’t want to damage your best or most expensive chisel when you’re still learning the process.
Start with a bench grinder if the chisel is damaged
A bad chisel will take a lot of time to sharpen with a honing guide and a sharpening stone. We recommend using a bench grinder to remove the excess steel from the damaged tip rapidly. Do not let your chisel overheat, as this can quickly happen while using a grinder.
Sharpening at 30 degrees reduces the amount of honing
Typically, new chisels come with only a slope, which is usually 25°. However, the ideal angle you should aim for (if two bevels are better for your workflow) for sharpening chisels is 30°. When you sharpen your chisel at 30 degrees you’re creating a new bevel. This may seem unpractical but it’s the recommended way to do it as you’ll hone away less steel.
Closing thoughts & our recommendation
Having a sharp chisel is crucial to completing your job well. Nevertheless, your chisel can turn blunt over time; hence, investing in the best honing guide for chisels becomes vital. For this reason, we have compiled a list of the best honing guide to help you narrow down your options.
However, if we were to select the winner among these products, we would recommend our top pick on this list. This product is not only affordable but also durable. Besides, you can sharpen your sculpting tools at nearly any angle, thereby ensuring versatility.